One of the challenges at the hospital where I work is to duplicate the old mailing lists they’ve had around since Exchange came out. Through each subsequent version the lists have been passed…and in some cases, they just won’t migrate or update and have to be recreated.
I found this specifically true for the “All Users” dynamic distribution list when migrating to Exchange 2007 from 2003.
Dynamic distribution lists just did not work when moved. Period. Luckily, there were only a handful of those in existence in our enterprise. The most important of course is used daily to get announcements out to everyone. When we migrated and things didn’t work, a major stick in the spokes of our hospital bike wheel was present. Weeping and gnashing of teeth ensued.
There are two steps to get this resolved…one takes place on the Exchange front and the other takes place on the Client side of things. It’s rather difficult on the client side of things because you’ll need to purge data from a cache file locally on each computer if it runs Outlook in cached mode.
First, we’ll go over how to recreate a dynamic distribution list to fit various needs and then we’ll go over what needs to happen client side to make sure the list works properly.
Server Side
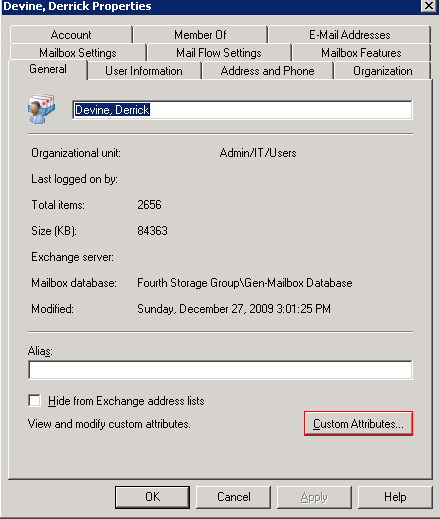
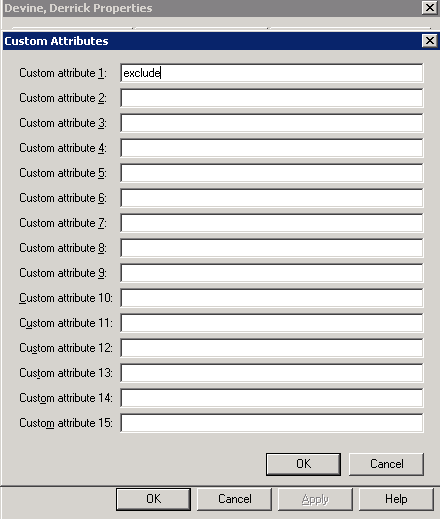
On the server side of things, creation of dynamic distribution lists with variables for exclusion or inclusion are much easier using the Exchange Management Shell. Using the console can be done in smaller environments where you might have mostly standard mailboxes, few contacts, and limited security groups, etc. In my case however, we have over 50 contacts and around 100 system mailboxes that are not checked regularly for mail. To limit these boxes from receiving mail, I used the Custom Attributes setting available to each mailbox when right clicking and selecting properties. Rather than try and exclude by OU (which is possible…but since 2007 switches to OPATH from LDAP…it’s a bit more difficult to master the right query) I elected to exclude by this set attribute. I’ve outlined the custom attribute button below on the right click properties of a mailbox in the Exchange Management Console.
After setting the customattribute1 to ‘exclude’ I can then create an exclusion rule for the Exchange Management Shell when creating a distribution list. It could be anything recorded in the custom attribute…it doesn’t necessarily have to be ‘exclude’…it could be ‘hide’ or just an asterisk. Determine what is best for you and use the shell command below to exclude those with the customattribute1 that you have set.
New-DynamicDistributionGroup -Name "AllOutlookUsers" -Recipientcontainer domain.org -RecipientFilter {((WindowsEmailAddress -like '*@domain.org') -and -not(CustomAttribute1 -eq "exclude") -and -not(Name -like 'SystemMailbox{*') -and -not(Name -like 'CAS{*') -and (RecipientType -eq "UserMailbox"))}
- -Recipientcontainer: tells us that the domain.org is the AD container where all users are found. If yours differs, enclose it in quotes, i.e., “domain.org/users” . Make sure you change it to your domain and don’t leave it as domain.org.
- -RecipientFilter: is our criteria for filtering out information in AD. In our instance above:
- we match only @domain.org email addresses
- we exclude system mailboxes
- we exclude our customattribute1 = exclude
- we exclude CAS system mailboxes
- we match only UserMailboxes so that we don’t mail contacts on this list
You could change things up a bit and perhaps add -and -not(department -eq ‘specialString’)) somewhere in which special string might be a department you want to exclude. For more information, open the exchange shell up and type get-help New-DynamicDistributionGroup | more (the more command appended to the end allows you to read one page at a time…spacebar moves forward a page) for more criteria you can add to the command.
Now that you’ve added in the distribution group, you’ll need to publish it and make it available to the masses. You can wait until Exchange does this automatically the next maintenance window or you can push it out the the OAB (Offline Addressbook) manually. In the Exchange Management Console, go to Organization Configuration >> Mailbox >> Offline Address Book tab. Right click the OAB and choose “update”
Client Side
Here comes the difficult part. There are 2 parts to making this play nicely with clients.
Part 1: The first part is that if you want people to immediately be able to use the new distribution group you just updated, you’ll need them to click on the small arrow beside send/receive:
From there choose “Download Address Book” and select the address book you want to download and click “OK”. This should be enabled for you but if it is grayed out, it may be prevented by group policy and thus you’ll need to see your group policy manager to re-enable. When the progress window disappears (if it doesn’t, just click close) that client now has the most recent version of the address book you updated and this should include the new dynamic distribution list you just created. However, there still can be problems as you’ll see in Part 2.
Part 2: Inside of Outlook, when you create a new email, there is an autocomplete history that is saved. Inside this .n2k file is cached addresses that you’ve sent to before that will fill in when you begin to type a few letters. While this saves time and effort…it wreaks havoc with the list you just created. Why?
In Exchange 2003, I had a dynamic distribution list named “AllOutlookUsers(New)” that everyone used. When updating to 2007 it was broke. Now that we’ve created a new dynamic distribution list named “AllOutlookUsers” guess what everyone will choose to mail to? That’s right, they’ll be getting “AllOutlookUsers(New)” from their Outlook client autocomplete history cache…which will completely bomb if they try to email to it.
How does one fix this? You can do one of two things. You can visit each client machine and delete the entry OR you can attempt to use group policy to delete the entire cache the next time they login. The second option you’ll find many people don’t like because ALL of their autocomplete stuff will be erased. The first option requires that you visit each individual outlook client…and of course, that’s going to give Administrators a horrible time.
To delete an entry, open up a new email and begin typing “all” in the address To: field. When the autocomplete selection pops below, use the arrow keys to highlight the old address…in my case “AllOutlookUsers(New)”…and then press the delete key. You’re done! That entry has been removed from the autocomplete cache for that individual user.
For those wanting to manage this via group policy, the file is named Outlook.NK2 by default and is located in the %APPDATAA\Microsoft\Outlook folder. Scripting it wouldn’t be too difficult. If you’re like me though you have your AllUsers distribution list controlled by a security group so that only a few people can email to it…which means I didn’t have to visit too many desktops to make sure they weren’t using the old address.
Hopefully, this helps a few of you out there to stomp out problems that might pop up when you go to create new dynamic distribution lists after migrating from Exchange 2003 to Exchange 2007.

