VT-x is not available Oracle Virtualbox Windows 10

This one stumped for for a while, I’m not going to lie.  VT-x was enabled inside the BIOS of my computer and it’s an i7-7700HQ which according to ark.intel.com supports VT-x.  Just the same, Oracle Virtualbox could not seem to start any VM I created giving me the following error:

VT-x is not available (VERR_VMX_NO_VMX).
Result Code: E_FAIL (0x80004005)
Component: ConsoleWrap
Interface: IConsole {872da645-4a9b-1727-bee2-5585105b9eed}

Some quick searching just tells me to enable VT-x in my BIOS….but it’s already enabled.  Other results talk about Hyper-V grabbing hold of the processor and not relinquishing control.  Advisement there is to use bcdedit to disable and then re-enable the hypervisor service.  I was desperate so why not right?  In that instance, you first set things to off and then back to on using bcdedit /set hypervisorlaunchtype off and then to auto.

Still no go.

After much head scratching with a pinch of teeth gnashing, I ran across an old support ticket on the Virtualbox ticketing system that showed the exact error I had (VT-x is not available).  The ticket referenced Avast Antivirus (which I run the free version of) as the cause.  I saw no way in which I could toggle “Enable Hardware-Assisted Virtualization” because that setting is not present in Avast Free (at least I couldn’t find it).

Uninstalled Avast Free.  Enabled Windows Defender.

The problem is now solved and VM’s now boot with no issues.  I wanted to record this here in case others had the same issue.  Avast Antivirus Free has this on by default and I couldn’t find a way to disable it and a 4 year old ticket submitted to virtualbox saves the day.

Restore Legacy Twitter After the Redesign Using User Agent Switcher

Hi folks.  Twitter messed up today.  They started rolling out a new design for their desktop users and it’s pure garbage:

twitter redesign
ugh…300% zoom anyone?


And here’s the kicker….YOU CAN’T REVERT BACK TO LEGACY TWITTER THEM.  They’re forcing this onto you with no recourse.

So what to do?  Well, we can tell twitter that we’re something we’re not to fool them into displaying the old theme.  This will delve into user agent switching for your browser.

User Agent Switching

What is user agent switching?  Every time you visit a website, your browser tells the website what it is using to display the information.  This is the user agent…just a small string of text that tells the site what Operating System and browser you are using.  There is a detailed explanation over at How-To Geek that covers user agents and how they work so if you’re interested, please do read their excellent write up there.

If you’re on board with fixing things…please read on.  We’re going to change the user agent that twitter.com thinks you’re using.

Chrome

If you use Chrome, go to the chrome web store and install the following add-on:


Once installed, the icon will appear in the standard location in the top right hand side of your browser.  Right click the icon and choose options.  Then select “Permanent Spoof List” and type twitter.com in the space provided and use the drop down to select Internet Explorer 10.  Then click the “Add” button.

chrome2chrome3

So things should look like this:
chrome4From here you’ll have to logout of twitter and clear all your cookies out.  Now go and log back into twitter and you should have the legacy theme back in play.

Firefox

Here’s what you can do with Firefox.  Same type of solution, we fix things by switching the user agent of the browser.  Go to the Firefox add-on site and search for user agent.  Install the following:

Firefox1


Firefox2

Add this to Firefox and then the add-on will appear in the top right hand corner of your browser.  Click on the icon and using the drop down menu select Internet Explorer…then click the following:

firefox3

Next right click on the add-on and manage extension.  Then choose the options tab:

Firefox4

In the section for ‘White-list mode’ type twitter.com and ensure the radio button for white-list mode is enabled/selected:

firefox5Next click save at the bottom of the page.

Firefox6


Now close the extension tab and right click the add-on icon in the top right hand corner.  Select ‘switch to white-list mode’.

Firefox7


Next, log out of twitter and clear all your cookies for twitter.com.  Keep in mind that this might not work for very long as Twitter will continue to roll out their theme using no opt out or opt in ability to more and more browsers and platforms.  Also keep in mind that you may have to work a bit with the custom browser agent strings for your platform (Mac, Linux, etc) in order to get a winning combination that allows for legacy twitter to work.

If you find an agent that works for your operating system, please share it below so that we can help one another figure stuff out!  Please keep in mind I have tested this in Chrome and Firefox (both current as of July 17, 2019) on Windows 10 (no 1903 feature installed).  Good luck and please remember to tell others about this post who are struggling with the new 300% zoom theme.  Also remember to tweet about this using

Missing BitLocker Recovery Tab ADUC in Windows 7

I spent hours looking for a solution.  I was missing the BitLocker Recovery Tab in Active Directory Users and Computers (ADUC) on Windows 7.  Honestly, there are a lot of posts about this…but almost all of them detail how to do things in Windows Server 2008 and Windows 7 is nowhere to be found.  Of course, I tried to use them for Windows 7…but nothing worked.

The problem:  I was missing the BitLocker tab that displays the BitLocker recovery key for Active Directory Users and Computers.  No amount of DLL re-registering or Remote Server Administration Toolkit (RSAT) installing (those 2 are solutions in Server 2008) helped me display that tab.

When I finally did solve this problem, I found I was very close the entire time…and it was simple.  As the saying goes, that only counts in horseshoes and hand grenades.  I found the simple solution by my non-Sherlock Holmes power of deduction….I knew BitLocker was a part of RSAT from Microsoft and so I figured that viewing the tab might be a feature add-on…and my suspicion was absolutely right.  Screenshots of everything for a visual representation of this solution below.

Note:  You must install Remote Server Administration Tools (RSAT) for Windows 7 before the feature we need to enable will become available.  Install that first, then come back here and perform the following steps:

appwiz
Windows-R to get run dialogue, type ‘appwiz.cpl’ and click ‘OK’
featureonoff
Click on “Turn Windows features on or off”
RSAT
Find Remote Server Administration Tools and expand it
RSATBitlock
Expand ‘Feature Administration Tools’ and check the box on ‘BitLocker Password Recovery Viewer’

That’s it.  Now when you go inside ADUC, you’ll have a recovery key tab available on PC’s you’ve encrypted using BitLocker.  All that fuss and hunting for a solution that takes about 3 minutes to fix.  Simple right?  I sure hope that in publishing this, I make it more readily available and searchable for those looking for the solution in the future…because it sure took me a long time to find it!  Thanks for reading!

How Do You Handle Automated Notifications in Your Enterprise?

Recently, we had an outage due to heat in some of our switch closets.  Not only did this generate a lot of alarm traffic for IT Systems…but it also generated a lot of alarm traffic for HVAC and even other systems as well.  In the end, we sent out so many automated notifications (emails) to pagers and cell phones that we got rate controlled and then subsequently blacklisted due to the massive volume of emails heading out of our SMTP IP Address.  This blacklist meant that email was brought to a screeching halt in the enterprise.  I had to have our Network Team fail us over to our secondary SMTP IP Address in order to get mail flowing again.  This of course, meant we were no longer using our primary network circuit and there were some DNS hiccups…and really, we didn’t need anything else to make the IT department look bad…DNS was the icing on the cake.

So my question to all the Email Administrators out there is…how do you handle automated notifications in your enterprise?  Do you have secondary SMTP servers with different IP Addresses that you use to send out automated notifications?  Do you use the same Exchange server but filter traffic using Exchange and virtual SMTP Servers to an external smart host?  How do you do it?

I hope someone has some examples for me and I appreciate any help you can give…we’re just venturing into territory I haven’t been in before and it’s always good to get perspective of those who have been there already.

Email Shows Delivered in Message Tracking But Not in User Inbox

This almost ranks right up there with my Ghost Delegates head scratcher of an issue.  Now we’re talking about ghost messages.  In my case, an automated system was sending out a notification email to a user in our enterprise environment.  I could track the message through our SPAM Firewall showing the hand-off (RECEIVE stamp) of the message to our Exchange 2007 Transport Server and then a DELIVER notification of the message being placed inside the mail store.

In other words:  The message was actually being delivered into the user inbox…but they never appeared there to the end user.  No pop-up notification of a new message in Outlook 2010 on the desktop.  Nothing.

So how do we troubleshoot this problem?  Luckily, I approached this the correct way right away so I saved myself tons of time and I’m going to share with you how I did it.

Where to Start – Cache Corruption

First and foremost, we use Outlook Cached Mode in our environment.  My first thoughts were that the cache file had become corrupt.  I’ve seen in the past where a user has not been able to send or receive email to individual distribution groups or they are unable to update an appointment…just really odd singular stuff like this.  So I backed up the user .ost file by closing Outlook and Windows Search tool and renaming it to username.ost.bak.  Then just startup Outlook and it thinks this is the first time it is starting up…so it re-establishes the .ost from scratch.  If there is any corruption, it will be inside of the old .ost file.

For some of you, this might fix your issue.  For me, it was back to the drawing board.

Second Step – Establish Where the Problem Exists

The second step is to isolate the problem.  Does it exist on the server or is it a problem with Outlook?  You can do this by shutting down Outlook and using Outlook Web Access (OWA).  Is the message delivered in OWA or to a mobile device when Outlook is closed?  If the answer is no, then the issue is NOT an Outlook issue.  If yes, congratulations…your issue is an Outlook Issue.  Switch it away from cached mode and try using Online mode…this should fix any issues you have.  Unfortunately, for my user, the issue did not go away…the message still did not show up.  This tells me the issue has to be server side.

Third Step – Check Spam/Junk Folder & Verify Message Delivery

The next step is to check spam folders and junk folders to make sure that the message isn’t getting held up there.  I made sure to whitelist the email address on both the client and the server side of things and I tested again.  Nothing was going into the spam folders.

I also wanted to make sure, not only with deliver stamps from Exchange, but with absolute proof that the mail message was being delivered.  You can do this by adding yourself as a journal recipient on the user account.  It is my understanding that Journal receipts process before the filters/rules/spam processing do inside an inbox.  So we can prove with 100% certainty that the message is arriving in the user mailbox by adding yourself as journal receipt and watching the mail come in.  This should also tell us that it absolutely is a rule that is the culprit versus anything else.

To do this, open up the Exchange Management Console and right click the user that is having a problem.  Choose properties.  Go to the Mail Flow Settings tab and choose ‘Delivery Options’.  Click ‘Properties’ and under the ‘Forward To’ section, choose yourself.  Don’t forget to check ‘Deliver message to both forwarding address and mailbox’ or your user won’t any mail.  In my case, after I chose these options and had a test message sent out…I received the email in MY inbox but the user still didn’t.  So, we now have 100% absolute proof that the message is making it to the inbox and that the user has a rule that is preventing it from being viewed.  Let’s see how we can fix this issue in the next step.

Fourth Step – Mail Rules

I know the issue isn’t existing on the client side (Outlook) but I went ahead and started Outlook using the /cleanrules flag from a command prompt.  This is supposed to clean out any mail processing rules from the end user.

[box type=”warning”] USE CAUTION! This will remove ALL rules from the user mailbox and the end user should be aware that they will need to recreate any that were previously in place.[/box]

In my case, the user had on 2 rules which were disabled and thus, even with the clean rules switch enabled…the problem was not fixed.

What to do now?  I knew something was grabbing the message from the inbox BEFORE it could synchronize to Outlook.  So I decided to check the rules in OWA to see if there was a difference (there shouldn’t be).  Upon looking in OWA, I found 3 rules present instead of 2.  All three were disabled.  This was different than the 2 disabled rules I found inside of Outlook.  When I looked at the rule, it was taking the ‘ghost message’ from the automated system and moving them to the ‘Inbox’…so there was some kind of loop.  They were arriving in the inbox, and then marking themselves as read and moving themselves to the Inbox again…somehow, they were disappearing from view when this happened.

I figured now it would be a simple case of deleting the rule right?  Exchange had other ideas.  I couldn’t delete the rule…and as I said, it was disabled but somehow still working.  I realized this was going to require more tools than I had on hand.

Last Step – Pesky Rules Managed by MFCMapi Tool

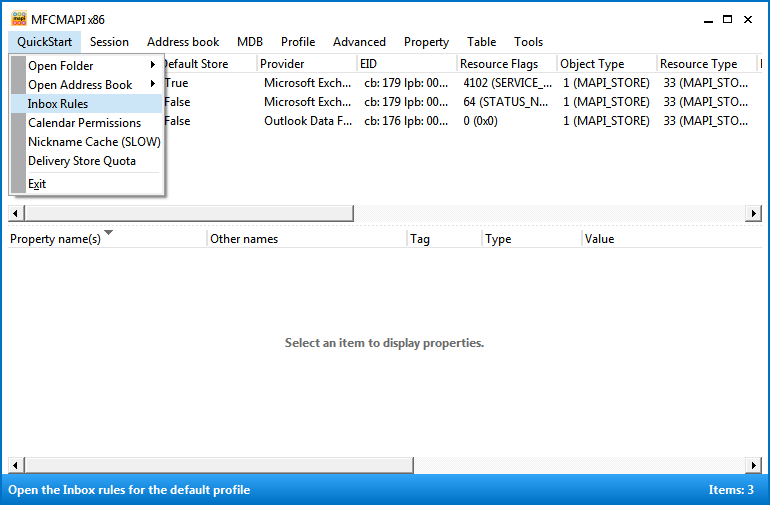
The last effort I could use on this problem is to look and see what was going on with the MFCMapi Tool.  This tool is available from Microsoft Codeplex and is a small executable that allows you to see a bit more going on in a mailbox than what you could normally see using standard tools.

On the client machine where Outlook is installed (the user who’s rules you want to change) open up MFCMapi.exe and choose the profile the user selects when opening their email.  This should give you something similar to the following screenshot:

mfcmapi

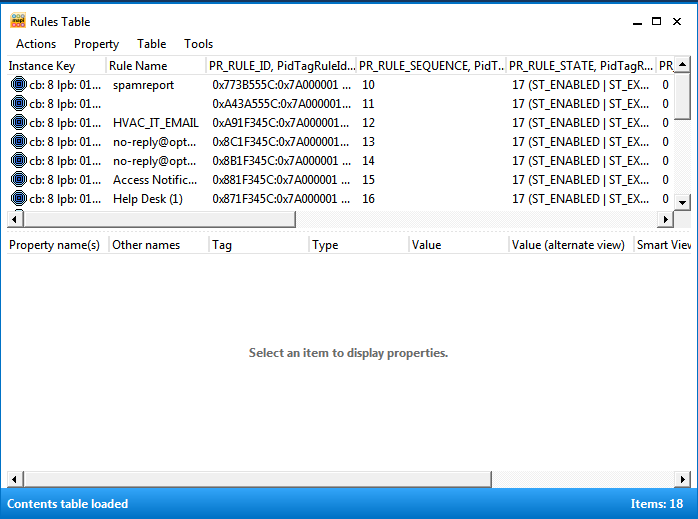
Open the rules section by going to QuickStart > Inbox Rules:

mfcmapi2

Search for the rule that you want to delete.  In my case, since all the rules were disabled already…I could delete all 3 rules.  Your situation may be different…the screenshot is actually my inbox rules so there are quite a few more than 3.  However, I was able to delete the rule using this interface where I couldn’t delete it from OWA and I couldn’t see it via Outlook.

mapi3

After deleting the rule, the emails began to show inside the user inbox and the mystery of the disappearing mail messages was solved.  I treated myself to some Scooby Snacks and Old Man Winters would have gotten away with it if it weren’t for those meddling kids.

Hopefully, this helps you out.  It is by no means a comprehensive troubleshooting guide…it’s just one that I often use to figure out where the issue lies.  I start with the client and move on to the server eliminating possible culprits along the way.  If you have any feedback or questions, please let me know in the comments section below.  Thanks for reading!

[box type=”info”] Side Note:  Interestingly enough, you can use this tool, MFCMapi.exe, to remove ghost delegates as well which is something I’ve spoken about in the past.  To do this, use MFCMapi.exe on the client PC where the delegate issue exists and look for the rule whose PR_RULE_PROVIDER is SCHEDULE+ EMS Interface and delete it.  Then have he user remove all delegates and then add back the ones they want.  Things will be magically repaired.[/box]


Disappearing Favorite Calendars in Outlook 2007 and 2010

Some of my users will submit tickets where they are missing ‘favorite’ calenders when they go into Outlook.  This is not a huge problem in itself because they can just browse to it via Public Folders (or whatever resource they add it from).  The main problem is that a user cannot add a favorite back after it has disappeared.  It’s more a frustration…because it’s not like the calendar is gone…it’s just not one click accessible.

So, I did quite a bit of research to solve this the first time it reared its head with no fix found.  I’ve had this happen enough times now that I decided to take the time to figure out exactly what was happening and how I could solve it.  There are three solutions I’ve found with first solution (#1 below) being a last resort.

  1. You can create a new mail profile. This resets everything you’ve customized unfortunately, so it is, in my opinion, a last resort.
  2. You can navigate to the folder that Outlook stores settings in. In Windows XP it defaults to:
    C:\Documents and Settings\<username>\Application Data\Microsoft\Outlook
    In this folder you will find a file called Outlook.xml. Very innocuous sounding, don’t you think? This is the file causing all of the woes! You should exit Outlook completely then rename the file or delete it. Restart Outlook and you will notice all of your favorites and calendars are gone. Add them back the way you would like, exit Outlook again and restart. *Poof* they are back and there to stay!
  3. This solution is hit or miss…it’s fixed it for some people and not for others.  Launch Outlook via command line with the /resetnavpane flag afterwards:  outlook.exe /resetnavpane

The problem of course is a corrupt file.  This Outlook.xml file for whatever reason becomes fragmented/corrupt and causes calendars to evaporate from your listing in Outlook with the inability to add them back in as persistent through start/exit of Outlook.

http://blog.palehorse.net/2007/09/26/outlook-ate-my-favorite-shortcuts/

I hope this helps someone because it took me a lot of digging to figure out what was going on.  In the blog post I linked to above, the person’s shortcuts were disappearing….different terminology that hid it from my search results.  I’ve taken the solutions from the blog post and posted them here because I don’t know how long other blog posts will be accessible.  I’ve had my blogs up and running since 2003 so I know they’re not going anywhere…so I record handy information for myself (and others?) here.  Thanks for readin!

iPhone Tips

iPhone tips

Your iPhone is likely to be your pride and joy right now. Which is hardly surprising considering how well it serves you. It never hurts to know a few extra tricks to help you get the best use out of your phone though. After all, if you’re anything like me, you’ll find yourself looking through http://www.o2.co.uk/iphone or your supplier’s web page looking for a new one to keep you entertained, rather than using your current iPhone to the best of its potential. Here are three tips to keep you on your toes.

Top of the web page

When you have been scrolling and reached the bottom, you normally want to go back up to the top of the page. Try tapping the status bar situated at the top of the iPhone display, near to the battery indicator. Then watch as the Safari browser flies back up to the beginning with little effort and time.

Camera short-cut

If you have the new iOS 5, you might have noticed that you can now launch the camera without having to put the pass code in to unlock the phone. You’re still locked out of the albums, email and dialling facilities for security, but you can take a photo at opportune moments now without fiddling with the codes.

Storage space

Do you know how much storage space you have left on your phone? There’s an easy way to check this out. Tap on Settings, General, Usage, and you’ll find a summary of how much storage you have used up and what you have left to spare. It will also let you know what space has been used up by what. For example, apps, videos and music etc.

Now go see what other tricks you can pick up on your own.

“This article has been contributed by O2”

User Appears in “All Users” list but not in Global Address List (GAL)

GAL vs All Users

Ever had a new user appear in the “All Users” Address list that you can access via your Address Book but that DO NOT APPEAR inside the Global Address Book (GAL)?

These are most likely users that have only recently been added…because the minute that Exchange does it’s standard maintenance window, it will most likely update.   But what if, like me, you need to have it update right away due to something like a BlackBerry server?

Through trial and error, I’ve found out WHY the user is not put into the Global Address List right away and how you can force it there.  Please note that I’m using Exchange 2007 with a separate CAS, HT, and Mailbox Server.  First, let’s go over what is happening and why it is and then we’ll go over how we can force the OAB (Offline Address Book) or GAL to update with these users.

What is Happening and Why?

So, you added Joe Smith to the company and you’ve right-click updated the “All Users” address list so he can be included in distribution lists and so that he receives emails on dynamic distribution lists.  Then you right clicked the OAB and selected ‘Update’.  Excellent!  Welcome to the company Joe!  But wait, Joe is not appearing inside the GAL/OAB you just updated!  Why is this problem happening!?  If you’re using the web distribution of the offline address book, the Exchange Client Access Server waits for a ‘polling time’ to arrive before it updates…just like any standard DFS (distributed file system) in Active Directory.  The default time is 480 minutes and of course, we don’t want to wait that long.  You can read all about how OAB via DFS works by visiting this link about Exchange polling times and OAB distribution.

Now that we know it isn’t working by design, how do we fix it?  We manually force it to poll.  We do this through the Exchange Management Shell:

update-filedistributionservice -identity Servername

Make sure you substitute in your Client Access Server where the OAB is distributed with ‘servername’ above.  A warning will appear if you do not have Unified Messaging installed on your server.  If you don’t, it is safe to ignore that warning.

After you’ve forced the update, manually download the address book in any Outlook client and the user will magically appear in the Global Address List.  Hope this helps someone…I know it took me a while to figure out what was happening.

Delegate Management of Distribution Groups

owner of group

Ever wanted to stop managing a distribution group because you get 90 million requests every other day to add someone or remove someone from said group?  Ok, maybe not 90 million but it has to be close to 80 million right?  Sometimes you will run across a distribution group that changes its membership frequently.  The best solution I’ve found is to find a point of contact for that group who will be able to manage the membership.  This means less requests to you in the future.

Normally, what I do is add the person as the ‘owner’ under the properties of the distribution group.  While this does nothing to give the person rights to the group, it does allow me to remember which member of the group is the point of contact.  In the example above, I added Scooby Doo as the owner of the 4th Floor NAs (nursing assistants) distribution group.  This allows me to remember the person (or cartoon dog) I am granting write permissions to manage the group to.

Next you have to do some powershell magic to grant write permissions to that very same person:

Add-ADPermission -Identity:'Group Display Name’ -User:domain\username -AccessRights ReadProperty, WriteProperty -Properties 'Member'

Now, if you wanted to grant permissions to a group of people…you might not be able to add an owner…but you can fill out the ‘notes’ section shown in the picture above and drop yourself a line to remember which Active Directory group has permissions to write membership of the group.  The command here would be:

Add-ADPermission -Identity:'Group Display Name’ -User:'Display Name of Permissions Group’ -AccessRights ReadProperty, WriteProperty -Properties 'Member'

I know this has been covered in countless other blogs and other nooks and crannies of the interwebs…I’m sure I’m not telling anyone anything new.  Please remember though that this blog is not only a tool for people to find on the internet…but also a knowledge repository for myself.  I can find the things that are most useful to me simply because I write about them.  I know where to look after I blog about them…and I can guarantee that this blog will be up indefinitely since I host it myself.  That’s more than I can claim for most blogs/resources of information out there covering these topics…most blogs dry up after a few years.

Hopefully, this information will help a few searching souls out there looking to decrease their distribution list management burden.  Thanks for reading!

Find Number of Mailboxes per Database with Powershell

I previously posted about how to count total number of what I thought was mailboxes on any given server…and today I realized that when I used the command from that post I was coming up with a number just a bit too high for what I was looking for.  I did some research and found out that this command finds any entry for any recipient on the server you’re running it and reports back.  For example, I have just over 2000 objects in Recipient Configuration in the Exchange Management Console (EMC).  This is reported back if I use that command.  What I really wanted to know though was how many users mailboxes I have per database.

Of course, powershell is the easiest way to accomplish this.  Powershell is POWERFULL…but sometimes you just need to do simple things with it and instead of having a simple powershell command, you have a complex one.  It’s not the fault of powershell of course…it’s just how things happen to work.  Just the same, here is the command that you can use to get a nice readout of how many users you have in each database:

Get-MailboxDatabase | Select Server, StorageGroupName, Name, @{Name="Number Of Mailboxes";expression={(Get-Mailbox -Database $_.Identity | Measure-Object).Count}} | Format-Table -AutoSize

Please note this command is for a single mailbox server environment…if you have clustered or multiple mailbox database servers the command will probably be different.  Breaking down the command…with Get-MailboxDatabase we’re selecting all databases in our environment.  Next we’re selecting a few columns of data…server, storage group name.  Next we’re selecting a column titled Number Of Mailboxes and we’re defining an expression.  The expression grabs the identity of the single database and then does a count of each individual mailbox…it then returns that value under the name “Number Of Mailboxes”.  The last bits format the table and autoresize it to fit on your powershell screen.

You could output this to CSV relatively easy as well and you could even incorporate this into a nightly report if you really wanted to.  I know the command isn’t very simple…which is odd considering that it should be much simpler to find out the number of people on a single database.  If there are easier ways to do this…I haven’t found them.  You can use EMC to select the column and then sort and highlight the number of people for a quick and easy way…but I prefer powershell.  I hope this helps someone out!  I know it is a command I can’t live without!

Creative Commons License
Except where otherwise noted, the content on this site is licensed under a Creative Commons Attribution-NonCommercial-ShareAlike 4.0 International License.