How Do You Handle Automated Notifications in Your Enterprise?

Recently, we had an outage due to heat in some of our switch closets.  Not only did this generate a lot of alarm traffic for IT Systems…but it also generated a lot of alarm traffic for HVAC and even other systems as well.  In the end, we sent out so many automated notifications (emails) to pagers and cell phones that we got rate controlled and then subsequently blacklisted due to the massive volume of emails heading out of our SMTP IP Address.  This blacklist meant that email was brought to a screeching halt in the enterprise.  I had to have our Network Team fail us over to our secondary SMTP IP Address in order to get mail flowing again.  This of course, meant we were no longer using our primary network circuit and there were some DNS hiccups…and really, we didn’t need anything else to make the IT department look bad…DNS was the icing on the cake.

So my question to all the Email Administrators out there is…how do you handle automated notifications in your enterprise?  Do you have secondary SMTP servers with different IP Addresses that you use to send out automated notifications?  Do you use the same Exchange server but filter traffic using Exchange and virtual SMTP Servers to an external smart host?  How do you do it?

I hope someone has some examples for me and I appreciate any help you can give…we’re just venturing into territory I haven’t been in before and it’s always good to get perspective of those who have been there already.

Email Shows Delivered in Message Tracking But Not in User Inbox

This almost ranks right up there with my Ghost Delegates head scratcher of an issue.  Now we’re talking about ghost messages.  In my case, an automated system was sending out a notification email to a user in our enterprise environment.  I could track the message through our SPAM Firewall showing the hand-off (RECEIVE stamp) of the message to our Exchange 2007 Transport Server and then a DELIVER notification of the message being placed inside the mail store.

In other words:  The message was actually being delivered into the user inbox…but they never appeared there to the end user.  No pop-up notification of a new message in Outlook 2010 on the desktop.  Nothing.

So how do we troubleshoot this problem?  Luckily, I approached this the correct way right away so I saved myself tons of time and I’m going to share with you how I did it.

Where to Start – Cache Corruption

First and foremost, we use Outlook Cached Mode in our environment.  My first thoughts were that the cache file had become corrupt.  I’ve seen in the past where a user has not been able to send or receive email to individual distribution groups or they are unable to update an appointment…just really odd singular stuff like this.  So I backed up the user .ost file by closing Outlook and Windows Search tool and renaming it to username.ost.bak.  Then just startup Outlook and it thinks this is the first time it is starting up…so it re-establishes the .ost from scratch.  If there is any corruption, it will be inside of the old .ost file.

For some of you, this might fix your issue.  For me, it was back to the drawing board.

Second Step – Establish Where the Problem Exists

The second step is to isolate the problem.  Does it exist on the server or is it a problem with Outlook?  You can do this by shutting down Outlook and using Outlook Web Access (OWA).  Is the message delivered in OWA or to a mobile device when Outlook is closed?  If the answer is no, then the issue is NOT an Outlook issue.  If yes, congratulations…your issue is an Outlook Issue.  Switch it away from cached mode and try using Online mode…this should fix any issues you have.  Unfortunately, for my user, the issue did not go away…the message still did not show up.  This tells me the issue has to be server side.

Third Step – Check Spam/Junk Folder & Verify Message Delivery

The next step is to check spam folders and junk folders to make sure that the message isn’t getting held up there.  I made sure to whitelist the email address on both the client and the server side of things and I tested again.  Nothing was going into the spam folders.

I also wanted to make sure, not only with deliver stamps from Exchange, but with absolute proof that the mail message was being delivered.  You can do this by adding yourself as a journal recipient on the user account.  It is my understanding that Journal receipts process before the filters/rules/spam processing do inside an inbox.  So we can prove with 100% certainty that the message is arriving in the user mailbox by adding yourself as journal receipt and watching the mail come in.  This should also tell us that it absolutely is a rule that is the culprit versus anything else.

To do this, open up the Exchange Management Console and right click the user that is having a problem.  Choose properties.  Go to the Mail Flow Settings tab and choose ‘Delivery Options’.  Click ‘Properties’ and under the ‘Forward To’ section, choose yourself.  Don’t forget to check ‘Deliver message to both forwarding address and mailbox’ or your user won’t any mail.  In my case, after I chose these options and had a test message sent out…I received the email in MY inbox but the user still didn’t.  So, we now have 100% absolute proof that the message is making it to the inbox and that the user has a rule that is preventing it from being viewed.  Let’s see how we can fix this issue in the next step.

Fourth Step – Mail Rules

I know the issue isn’t existing on the client side (Outlook) but I went ahead and started Outlook using the /cleanrules flag from a command prompt.  This is supposed to clean out any mail processing rules from the end user.

[box type=”warning”] USE CAUTION! This will remove ALL rules from the user mailbox and the end user should be aware that they will need to recreate any that were previously in place.[/box]

In my case, the user had on 2 rules which were disabled and thus, even with the clean rules switch enabled…the problem was not fixed.

What to do now?  I knew something was grabbing the message from the inbox BEFORE it could synchronize to Outlook.  So I decided to check the rules in OWA to see if there was a difference (there shouldn’t be).  Upon looking in OWA, I found 3 rules present instead of 2.  All three were disabled.  This was different than the 2 disabled rules I found inside of Outlook.  When I looked at the rule, it was taking the ‘ghost message’ from the automated system and moving them to the ‘Inbox’…so there was some kind of loop.  They were arriving in the inbox, and then marking themselves as read and moving themselves to the Inbox again…somehow, they were disappearing from view when this happened.

I figured now it would be a simple case of deleting the rule right?  Exchange had other ideas.  I couldn’t delete the rule…and as I said, it was disabled but somehow still working.  I realized this was going to require more tools than I had on hand.

Last Step – Pesky Rules Managed by MFCMapi Tool

The last effort I could use on this problem is to look and see what was going on with the MFCMapi Tool.  This tool is available from Microsoft Codeplex and is a small executable that allows you to see a bit more going on in a mailbox than what you could normally see using standard tools.

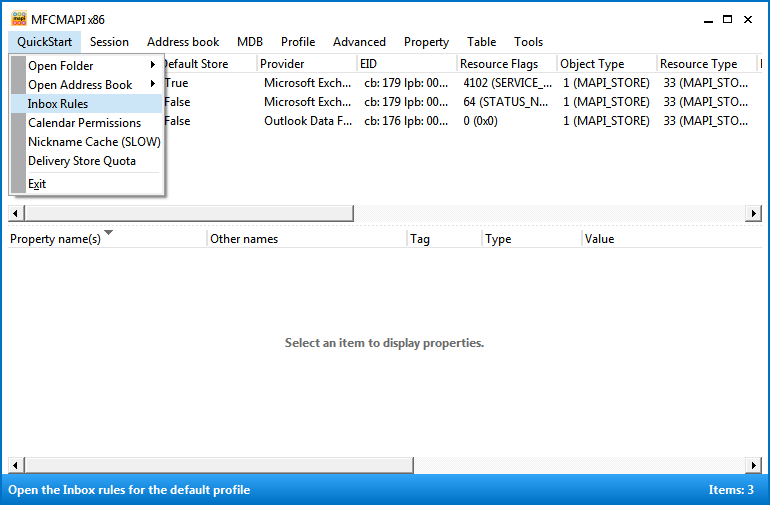
On the client machine where Outlook is installed (the user who’s rules you want to change) open up MFCMapi.exe and choose the profile the user selects when opening their email.  This should give you something similar to the following screenshot:
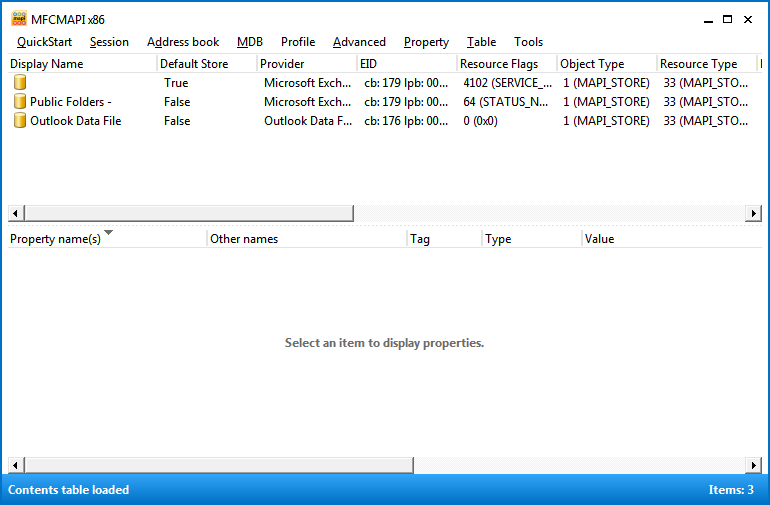
mfcmapi

Open the rules section by going to QuickStart > Inbox Rules:
mfcmapi2

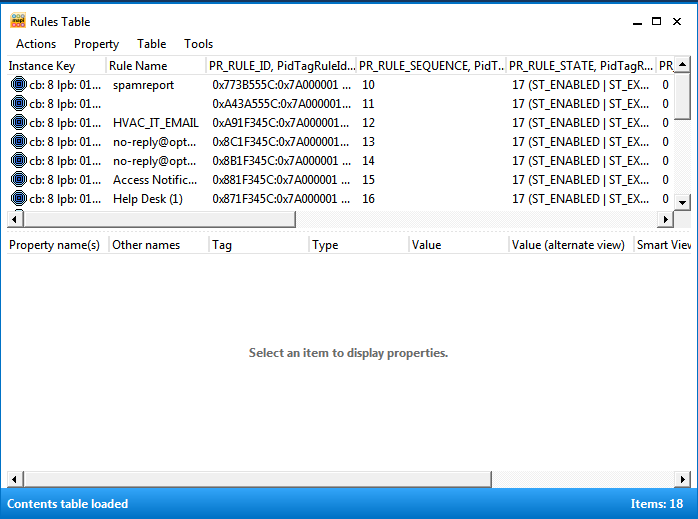
Search for the rule that you want to delete.  In my case, since all the rules were disabled already…I could delete all 3 rules.  Your situation may be different…the screenshot is actually my inbox rules so there are quite a few more than 3.  However, I was able to delete the rule using this interface where I couldn’t delete it from OWA and I couldn’t see it via Outlook.
mapi3

After deleting the rule, the emails began to show inside the user inbox and the mystery of the disappearing mail messages was solved.  I treated myself to some Scooby Snacks and Old Man Winters would have gotten away with it if it weren’t for those meddling kids.

Hopefully, this helps you out.  It is by no means a comprehensive troubleshooting guide…it’s just one that I often use to figure out where the issue lies.  I start with the client and move on to the server eliminating possible culprits along the way.  If you have any feedback or questions, please let me know in the comments section below.  Thanks for reading!

[box type=”info”] Side Note:  Interestingly enough, you can use this tool, MFCMapi.exe, to remove ghost delegates as well which is something I’ve spoken about in the past.  To do this, use MFCMapi.exe on the client PC where the delegate issue exists and look for the rule whose PR_RULE_PROVIDER is SCHEDULE+ EMS Interface and delete it.  Then have he user remove all delegates and then add back the ones they want.  Things will be magically repaired.[/box]


User Appears in “All Users” list but not in Global Address List (GAL)

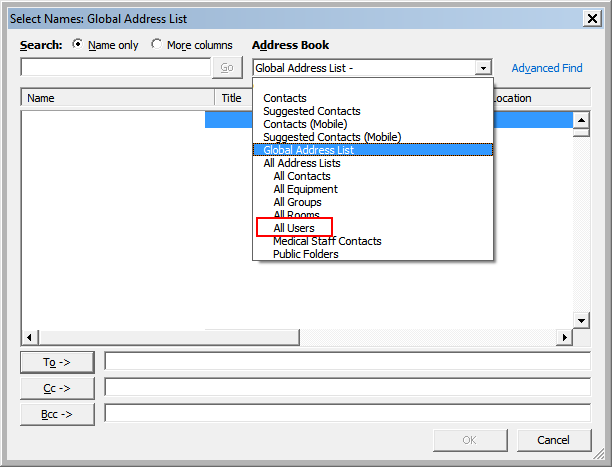
GAL vs All Users

Ever had a new user appear in the “All Users” Address list that you can access via your Address Book but that DO NOT APPEAR inside the Global Address Book (GAL)?

These are most likely users that have only recently been added…because the minute that Exchange does it’s standard maintenance window, it will most likely update.   But what if, like me, you need to have it update right away due to something like a BlackBerry server?

Through trial and error, I’ve found out WHY the user is not put into the Global Address List right away and how you can force it there.  Please note that I’m using Exchange 2007 with a separate CAS, HT, and Mailbox Server.  First, let’s go over what is happening and why it is and then we’ll go over how we can force the OAB (Offline Address Book) or GAL to update with these users.

What is Happening and Why?

So, you added Joe Smith to the company and you’ve right-click updated the “All Users” address list so he can be included in distribution lists and so that he receives emails on dynamic distribution lists.  Then you right clicked the OAB and selected ‘Update’.  Excellent!  Welcome to the company Joe!  But wait, Joe is not appearing inside the GAL/OAB you just updated!  Why is this problem happening!?  If you’re using the web distribution of the offline address book, the Exchange Client Access Server waits for a ‘polling time’ to arrive before it updates…just like any standard DFS (distributed file system) in Active Directory.  The default time is 480 minutes and of course, we don’t want to wait that long.  You can read all about how OAB via DFS works by visiting this link about Exchange polling times and OAB distribution.

Now that we know it isn’t working by design, how do we fix it?  We manually force it to poll.  We do this through the Exchange Management Shell:

update-filedistributionservice -identity Servername

Make sure you substitute in your Client Access Server where the OAB is distributed with ‘servername’ above.  A warning will appear if you do not have Unified Messaging installed on your server.  If you don’t, it is safe to ignore that warning.

After you’ve forced the update, manually download the address book in any Outlook client and the user will magically appear in the Global Address List.  Hope this helps someone…I know it took me a while to figure out what was happening.

Find Number of Mailboxes per Database with Powershell

I previously posted about how to count total number of what I thought was mailboxes on any given server…and today I realized that when I used the command from that post I was coming up with a number just a bit too high for what I was looking for.  I did some research and found out that this command finds any entry for any recipient on the server you’re running it and reports back.  For example, I have just over 2000 objects in Recipient Configuration in the Exchange Management Console (EMC).  This is reported back if I use that command.  What I really wanted to know though was how many users mailboxes I have per database.

Of course, powershell is the easiest way to accomplish this.  Powershell is POWERFULL…but sometimes you just need to do simple things with it and instead of having a simple powershell command, you have a complex one.  It’s not the fault of powershell of course…it’s just how things happen to work.  Just the same, here is the command that you can use to get a nice readout of how many users you have in each database:

Get-MailboxDatabase | Select Server, StorageGroupName, Name, @{Name="Number Of Mailboxes";expression={(Get-Mailbox -Database $_.Identity | Measure-Object).Count}} | Format-Table -AutoSize

Please note this command is for a single mailbox server environment…if you have clustered or multiple mailbox database servers the command will probably be different.  Breaking down the command…with Get-MailboxDatabase we’re selecting all databases in our environment.  Next we’re selecting a few columns of data…server, storage group name.  Next we’re selecting a column titled Number Of Mailboxes and we’re defining an expression.  The expression grabs the identity of the single database and then does a count of each individual mailbox…it then returns that value under the name “Number Of Mailboxes”.  The last bits format the table and autoresize it to fit on your powershell screen.

You could output this to CSV relatively easy as well and you could even incorporate this into a nightly report if you really wanted to.  I know the command isn’t very simple…which is odd considering that it should be much simpler to find out the number of people on a single database.  If there are easier ways to do this…I haven’t found them.  You can use EMC to select the column and then sort and highlight the number of people for a quick and easy way…but I prefer powershell.  I hope this helps someone out!  I know it is a command I can’t live without!

Powershell Recipient Count for Exchange 2007

The other day I wanted to get a quick count of how many recipients I had in the enterprise.  Of course, I wanted to be able to run a powershell command instead of going into the EMC.  I fooled around with the Get-MailboxStatistics command until I got what I wanted and figured it would be a nice little one liner to share:

Get-MailboxStatistics | group MailboxDatabase | format-table count

This is a very simple command that just outputs the count (number) of recipients you have on a given exchange mailbox server.  Of course, if you have more than one server you’ll need to specify that inside the command.  Since I only have one, it’s pretty simple.

UPDATED:  Please note that this returns ALL recipients…not just mailboxes (as I thought when I initially posted this).  That means contacts, distribution groups, etc.   For a way to find how many user mailboxes you have in each database check this post.  Thanks for reading!

Migration Tip – XML Logs

When migrating from Exchange 2003 to Exchange 2007, I had problems with disk space on one of our network drives.  For the life of me, I couldn’t figure out what the problem was until we had about 100MB left.  Then I realized that every single mailbox move was being logged!  Try running a script that moves hundreds over at a time and then think of the log files!

I ran across a blog post that details just this and what to do about it.  Hopefully you won’t end up like me finding out after the fact!

http://www.telnetport25.com/component/content/article/11-exchmig/320-exchange-2007-tracking-and-analysing-large-mailbox-move-reports-using-the-exchangemovemailboxtaskviewer-tool.html

AllOutlookUsers Distribution List

One of the challenges at the hospital where I work is to duplicate the old mailing lists they’ve had around since Exchange came out.  Through each subsequent version the lists have been passed…and in some cases, they just won’t migrate or update and have to be recreated.

I found this specifically true for the “All Users” dynamic distribution list when migrating to Exchange 2007 from 2003.

Dynamic distribution lists just did not work when moved.  Period.  Luckily, there were only a handful of those in existence in our enterprise.  The most important of course is used daily to get announcements out to everyone.  When we migrated and things didn’t work, a major stick in the spokes of our hospital bike wheel was present.  Weeping and gnashing of teeth ensued.

There are two steps to get this resolved…one takes place on the Exchange front and the other takes place on the Client side of things.  It’s rather difficult on the client side of things because you’ll need to purge data from a cache file locally on each computer if it runs Outlook in cached mode.

First, we’ll go over how to recreate a dynamic distribution list to fit various needs and then we’ll go over what needs to happen client side to make sure the list works properly.

Server Side

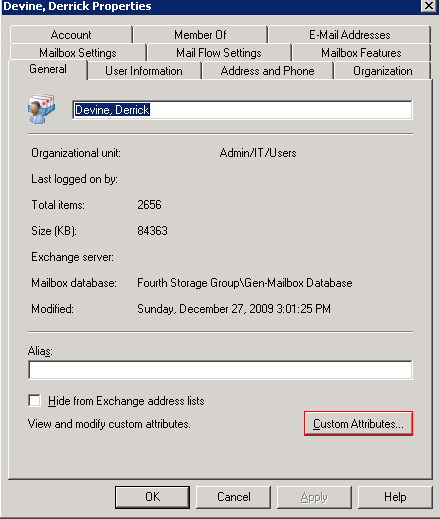
On the server side of things, creation of dynamic distribution lists with variables for exclusion or inclusion are much easier using the Exchange Management Shell.  Using the console can be done in smaller environments where you might have mostly standard mailboxes, few contacts, and limited security groups, etc.  In my case however, we have over 50 contacts and around 100 system mailboxes that are not checked regularly for mail.  To limit these boxes from receiving mail, I used the Custom Attributes setting available to each mailbox when right clicking and selecting properties.  Rather than try and exclude by OU (which is possible…but since 2007 switches to OPATH from LDAP…it’s a bit more difficult to master the right query) I elected to exclude by this set attribute.  I’ve outlined the custom attribute button below on the right click properties of a mailbox in the Exchange Management Console.

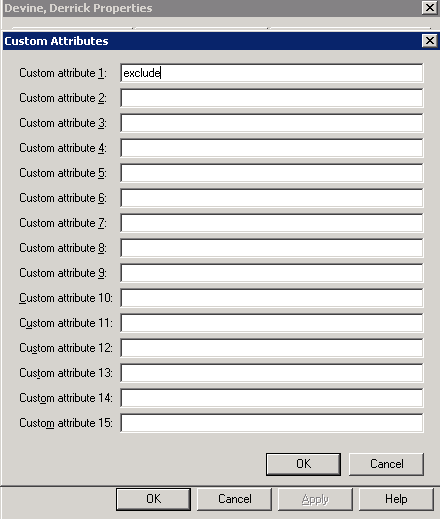
After setting the customattribute1 to ‘exclude’ I can then create an exclusion rule for the Exchange Management Shell when creating a distribution list.  It could be anything recorded in the custom attribute…it doesn’t necessarily have to be ‘exclude’…it could be ‘hide’ or just an asterisk.  Determine what is best for you and use the shell command below to exclude those with the customattribute1 that you have set.

New-DynamicDistributionGroup -Name "AllOutlookUsers" -Recipientcontainer domain.org -RecipientFilter {((WindowsEmailAddress  -like '*@domain.org') -and -not(CustomAttribute1 -eq "exclude") -and -not(Name -like 'SystemMailbox{*') -and -not(Name -like 'CAS{*') -and (RecipientType -eq "UserMailbox"))}
  • -Recipientcontainer: tells us that the domain.org is the AD container where all users are found.  If yours differs, enclose it in quotes, i.e., “domain.org/users” .  Make sure you change it to your domain and don’t leave it as domain.org.
  • -RecipientFilter: is our criteria for filtering out information in AD.  In our instance above:
    • we match only @domain.org email addresses
    • we exclude system mailboxes
    • we exclude our customattribute1 = exclude
    • we exclude CAS system mailboxes
    • we match only UserMailboxes so that we don’t mail contacts on this list

You could change things up a bit and perhaps add -and -not(department -eq ‘specialString’)) somewhere in which special string might be a department you want to exclude.  For more information, open the exchange shell up and type get-help New-DynamicDistributionGroup | more (the more command appended to the end allows you to read one page at a time…spacebar moves forward a page) for more criteria you can add to the command.

Now that you’ve added in the distribution group, you’ll need to publish it and make it available to the masses.  You can wait until Exchange does this automatically the next maintenance window or you can push it out the the OAB (Offline Addressbook) manually.  In the Exchange Management Console, go to Organization Configuration >> Mailbox >> Offline Address Book tab.  Right click the OAB and choose “update”

Client Side

Here comes the difficult part. There are 2 parts to making this play nicely with clients.

Part 1: The first part is that if you want people to immediately be able to use the new distribution group you just updated, you’ll need them to click on the small arrow beside send/receive:

From there choose “Download Address Book” and select the address book you want to download and click “OK”.  This should be enabled for you but if it is grayed out, it may be prevented by group policy and thus you’ll need to see your group policy manager to re-enable.  When the progress window disappears (if it doesn’t, just click close) that client now has the most recent version of the address book you updated and this should include the new dynamic distribution list you just created.  However, there still can be problems as you’ll see in Part 2.

Part 2: Inside of Outlook, when you create a new email, there is an autocomplete history that is saved.  Inside this .n2k file is cached addresses that you’ve sent to before that will fill in when you begin to type a few letters.  While this saves time and effort…it wreaks havoc with the list you just created.  Why?

In Exchange 2003, I had a dynamic distribution list named “AllOutlookUsers(New)” that everyone used.  When updating to 2007 it was broke.  Now that we’ve created a new dynamic distribution list named “AllOutlookUsers” guess what everyone will choose to mail to?  That’s right, they’ll be getting “AllOutlookUsers(New)” from their Outlook client autocomplete history cache…which will completely bomb if they try to email to it.

How does one fix this?  You can do one of two things.  You can visit each client machine and delete the entry OR you can attempt to use group policy to delete the entire cache the next time they login.  The second option you’ll find many people don’t like because ALL of their autocomplete stuff will be erased.  The first option requires that you visit each individual outlook client…and of course, that’s going to give Administrators a horrible time.

To delete an entry, open up a new email and begin typing “all” in the address To: field.  When the autocomplete selection pops below, use the arrow keys to highlight the old address…in my case “AllOutlookUsers(New)”…and then press the delete key.  You’re done!  That entry has been removed from the autocomplete cache for that individual user.

For those wanting to manage this via group policy, the file is named Outlook.NK2 by default and is located in the %APPDATAA\Microsoft\Outlook folder.  Scripting it wouldn’t be too difficult.  If you’re like me though you have your AllUsers distribution list controlled by a security group so that only a few people can email to it…which means I didn’t have to visit too many desktops to make sure they weren’t using the old address.

Hopefully, this helps a few of you out there to stomp out problems that might pop up when you go to create new dynamic distribution lists after migrating from Exchange 2003 to Exchange 2007.

Moving Mailboxes from Exchange 2003 to Exchange 2007

During a migration from Exchange 2003 to Exchange 2007 many find that having 4 maximum thread transactions happening simultaneously is a bottleneck. Using powershell, one can increase the maximum number above 4 and save time and effort in the process.

During a migration from Exchange 2003 to Exchange 2007 many find that having 4 maximum thread transactions (default in using the Exchange Management Console) happening simultaneously is a bottleneck.  Using powershell, one can increase the maximum number above 4 and save time and effort in the process.

Some things to keep in mind during the migration:

  1. Tons of transaction logs will be generated and won’t be wiped until a backup happens…make sure you have space on your transaction log disks.
  2. Make sure your Mailbox Server has plenty of physical resources available to use during the move…RAM is a specific concern.  Always overshoot your estimates on how much RAM you need.
  3. Error reporting in the shell isn’t as intuitive as you’ll get using the EMC (Exchange Management Console)

My specific environment was moving from a single backend 2003 server to a single 2007 mailbox server.  The cmdlet that is posted can be used to move a mailbox database/storagegroup from one physical server to a another database/storagegroup on a different physical server.  I’ll go through what each section of the cmdlet means.

Get-Mailbox –Database “2003ServerName\StorageGroupName\DatabaseName” | Move-Mailbox –TargetDatabase “2007ServerName\StorageGroup\Database” –MaxThreads 10

The command above should be executed in powershell on your 2007 Mailbox Database Server.  The Get-Mailbox -Database command will tell Exchange where the mailboxes you are moving are coming from.   You then Move-Mailbox to a target database on the 2007 Mailbox Server.  The last portion of the command tells the command to increase the max threads of the command from 4 to 10.  Please make sure that you substitute in the server names, storage group names, and database names appropriately.

Remember that this will only move one database at a time…if you are like me, you like to take small steps in the process and verify that things look good after each small step.  Hopefully, this helps your migration take a little less time.

Creative Commons License
Except where otherwise noted, the content on this site is licensed under a Creative Commons Attribution-NonCommercial-ShareAlike 4.0 International License.